 |
| Here is a home made modern day Snow White costume. Using BeFunky's design took, I was able to take the photo and place a cute quote off to the side. With the text took I was able to play with the font until I got what I liked. For the red background I used the eyedropper tool to select a bit of red from the bow. This costume is made from a regular pair of blue pants, a cute yellow dress, and a piece of ribbon used to tie presents with. (yep that happened) Then to complete the look a bright red apple was added. |
Saturday, December 19, 2015
DYI Snow White Costume
Saturday, November 28, 2015
No One Remembers...
 |
| Hello! So in honor of tonight's episode of Doctor Who, I have made this fanart. The Doctor says this quote, and it really stuck in my head. So I looked up from reference photos and tada! Beautiful art! |
Friday, November 27, 2015

Wednesday, November 25, 2015
Eleventh Doctor Drawing
 |
| Hello! So today I decided to give it another try at drawing the Eleventh Doctor. This is a very different style of drawing, but I think I like it ;D |

Eleventh Doctor Free Hand Drawing
 |
| Hello guys! So after being inspired to draw, I decided to give it a try. So this is my attempt of the eleventh doctor. |
Saturday, November 21, 2015
Let Me Be Brave: Doctor Who Fan Art
 |
| Hello guys! So in honor of one of my favorite characters I made this. It is a quote Clara Oswald says in the last episode (still sad about that one). I was inspired by what she said so I created a space art using befunky.com and picmonkey.com I then added the words and tada! Super awesome art! |
Tuesday, November 17, 2015
I Wish I Knew Poem
 |
| Here is a poem I created called I Wish I Knew. I created the background using befunky and picmonkey. |
Saturday, October 24, 2015
Times Up Cover
 |
| Here is a cover I made for a role play cover. I used befunky (which has just updated omg!!) |
Saturday, October 17, 2015

Wednesday, October 14, 2015
Inking My Art
Hey everyone! So I have been working on my drawing more (which still needs a lot of improvement) and I decided to try and ink one of my drawings. For all who don't know, this is just making your art digital I think. I used a drawing app on my computer to trace over a phtoto of the original drawing to create this character :D
 |
| Original |
 |
| Final |
Thursday, July 2, 2015
The Lunar Chronicles Bookmark Contest
 |
| IT IS DONE! *does a victory dance* Finally my entry is complete! For this little beauty I had to use 3 websites! (labeled below) I took a black background and added a light effect to it using the site, befunky. I then took it over to Picmonkey and added the star background texture. Then I played around with the blending and got my amazing background! Then I took it over to Pixlr and added the moon crescent logo. After a lot of messing around I then brought the new background over to befunky (again) and added the text (which is called: 2 peas masterpiece). For the coloring I went over to Pixlr and took some coloring from the moon and tada! My bookmark is complete! Mostly what took so long was picking the right quote; and I am very pleased with this one ;D I did this all from scratch and I really enjoyed it. The links: befunky.com http://pixlr.com/editor/ picmonkey.com |
Thursday, May 28, 2015
Galaxy Effect!
 |
| Hey guys so today I learned how to make a galaxy effect! With this simple tutorial I did this in about 15 minuets. I am really happy with how it came out so if you wanna learn how to do it click on the link below! This assignment uses two different types of filters and a few blending options. Its super simple and looks really cool! http://www.instructables.com/id/photoshop-galaxy-effect/ |

Saturday, April 25, 2015
You Know To Much Sigg
 |
| So for this sigg I used befunky again. I made it because it really is true, my bff knows WAY to much about me XD |
Monday, March 30, 2015
I Want to Save You From the Monsters
 |
| So this image I made for a friend of mine; I want to help my friends from the monsters both inside and outside of themselves. I made this on the new BeFunky with the text tool and I found the image online (so credit to whoever you are!!!) |
Friday, March 27, 2015
Butterfly Wings
 |
| Hello there! So for this project I was told to take a picture of a dog and add wings onto it. I first took a picture of a butterfly and traded it in InDesign. Then I transferred it over to photoshop. I then found A photo of a dog (who is cute btw X3) and cropped her into her own layer. Then I took the wings and found a picture of a purple flower petal. Then after I used the stamp tool to add the flower design onto the wings I used a blend tool called Color Dodge. Then I thinned out the dog a bit and used the stamp tool to fix the grass. I then placed the wings where I wanted them and drew the antennas. I really enjoyed doing this and I am proud of using the tools I learned :D |
Monday, March 16, 2015


I bear it so they don't have to...
 |
| So with The 100 season finale just happening, it inspired me to make this image. I used befunky.com again and played with the opacity of the font. This part of the show was really powerful to me and I felt like making this image in tribute of it. I really get the feels when I read this quote <3 |
Sunday, March 15, 2015
Book Sigg
 |
| So to make this sigg I used the website befunky.com This is a super easy and free photo editing website. To make this sigg i took an image and cropped it to the size i needed. Then I used the text tool to add text. It was super easy and I like how it turned out :D |
Monday, February 9, 2015
Painting with text two!
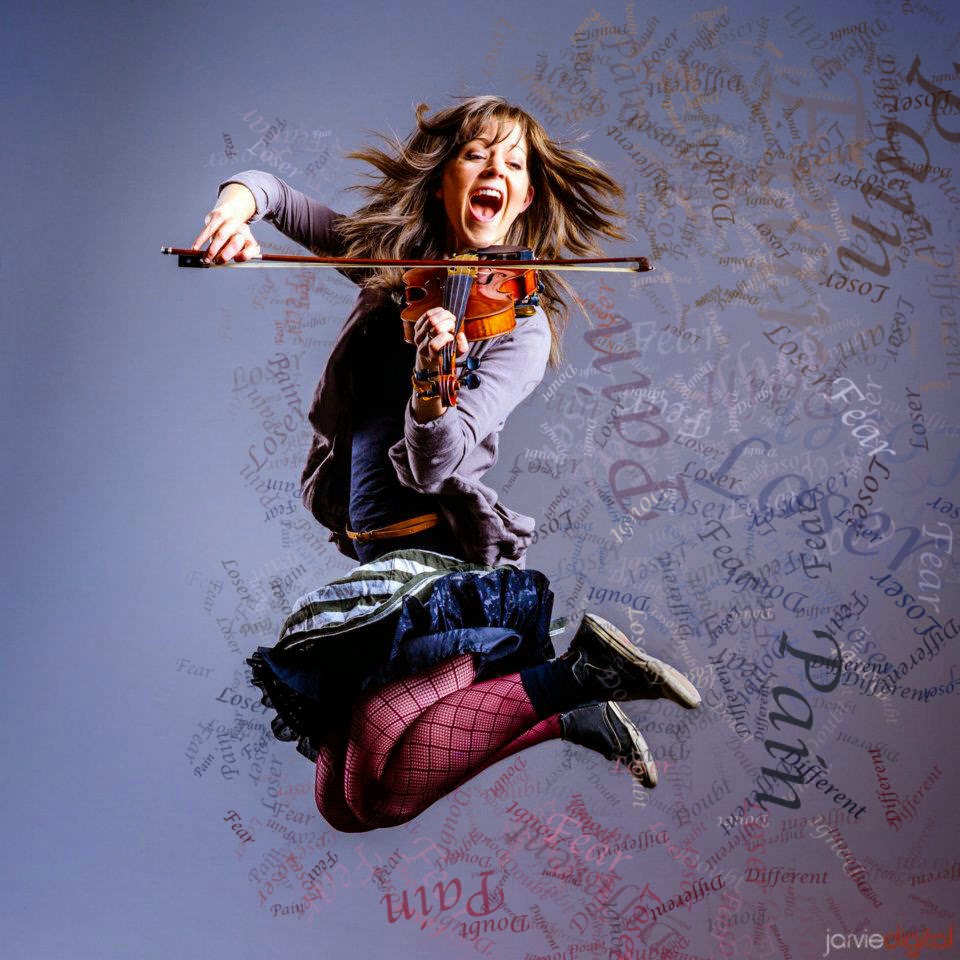 |
| Painting with text! I decided to do one more painting with text with one of my favorite artist, Lindsey Stirling. The words coming off of her are supost to represent her letting go of the feelings and lies she was told over the years. I really enjoyed learning this and I definitely want to do it again XD |
Use Photoshop in a New Way!
 |
| In this project I used Photoshop in a new way! I learned how to make the photo effect by using my marquee tool and the fill bucket. The tutorial video was not working so I also looked up my first assignment online (pasted below). I really enjoyed doing this and I hope I get the chance to use it again :D |
http://www.photoshopessentials.com/photo-effects/polaroids/
Thursday, February 5, 2015
Valentine
 |
| Happy Valentines Day! For this assignment I learned more about the Layer Styles. After adding multiple layer styles to my heart I then worked on the text. Some layer styles I used were Emboss, inner Shadow, satin, and outer glow. I then added some styles onto the words. Then I used the shape tool to create the thing on the top and added a layer style to that. I really liked how it came out and you should try it :D |
Wednesday, February 4, 2015
Photo Breakup
 |
| So in class today we did a photo breakup. This is when you take your square brush and use it. I make a background out of white and then add a layer mask to my image. Then I scatter my brush and play around with it until I am happy, and then I have at it ;) This was a really cool assignment and I like how everything came out :D |


Tuesday, February 3, 2015
Custom Brush Doctor Who!!
 | |
|
Custom Brushes
 |
| So for this assignment I learned how to make my own custom brush! You choose an image and then add it to your brushes. Then you go onto your brush settings and mess around with that. I learned more about how to make the colors mix and more about the brush tool in general. This is a really cool thing to use and I really recommend it :D |
Friday, January 30, 2015
Kaleidoscope
 |
| So for this project I go to make a kaleidoscope! You pick an image and move it to the size you would like. Next you move the image over a bit and tilt it. If you want to make the spiral effect make the image a bit smaller when you move it. Then you undo that. Next you hold Command, alt, and shift together and press "T". Then you continue to press the letter T until you are satisfied :D |
Thursday, January 29, 2015
Painting With Text!
 |
| Painting with text!! So I have always wanted to do something like this and I was really happy when I saw this was my next assignment :D I learned how to make a brush out of text and how to scatter it around. I also used the stamp tool to add onto the background wider. Also in the process I learned how to use my keyboard to pull up tools to use. I really learned a lot in this project and Im really happy with how it came out, I hope I get to do it again!! OuO |
 |
| Original Image |
Monday, January 19, 2015
Doctor Who Calendar Cover!!
 |
| So for this project I made another Calendar Cover!! I used the same skills that I used for my last calendar and I love how it turned out! Throughout this entire assignment I learned how to add actions, copy drop shadows, how to make images the same width apart, and so much more!! Its a lot of fun to do and you should definitely try!! |
Thursday, January 15, 2015
Calender Review Project
 |
| So for this project we learned how to make a calendar cover. I took four pictures and learned how to cut them down by using actions. I also learned how to use actions on text. Actions are super helpful and they help get things done faster :D |
Tuesday, January 13, 2015
Photoshop Actions
 |
| So for this project we used actions! I learned how to save an action and how to use it quickly. I have it set so that all I have to do is push on Shift and F6 and then this action shows up. This action uses Auto Contrast, then Auto Color, and lastly Auto Tone. |
 |
| For this picture I went into the frame area on Actions and I used the splatter frame :D |
Monday, January 12, 2015
Patterns!!
 |
| So for this project we learned how to make patterns. First you create a file and give it a background. After you pick a pattern for your brush to be (ex. Snowflake). Then you place it at random, careful not to go over the edges. Next you go to filter, other, and then offset. You set the numbers to half of the size your page is. Then you define the pattern. After that is all done you go onto another file and use the paint tool to fill in your patter. This was super cool and I love how they come out! :D |
Friday, January 9, 2015
Review
So for the past couple of days I have been doing a review of everything :D
The Liquify filter was not working but my teacher saw me using it. :)
.jpg) |
| Before |
 |
| After I added a white border onto this picture. You can do any color really :D |
.jpg) |
| Before |
 |
| After! For this one I selected the sweater and filled the selected area with red. Then I used filters and changed the color of it :D |
.jpg) |
| before |
 |
| after! So for this one I did another face swap ;D |
The Liquify filter was not working but my teacher saw me using it. :)
 |
| before |
 |
| After!! So for this one I used the puppet warp tool to make him smile a little more ;3 |
 |
| Before.. |
 |
| AFTER! Everyones dream right? Lots of cute bunnies!! To do this I used the clone tool and cloned the bunny multiple times ;) |
 |
| For this one I used the path tool to create a path and then I stroked it to get the blue color. After that I used the text tool to add some text ;) |
 |
| Clip Text!! For this one I found a picture of the TARDIS and wrote what TARDIS stands for. Then I moved the TARDIS underneath the words and created a clipping mask ;3 |
 |
| So next I used Blending. I blended 3 pictures to create this wonderful thing ;) For this one I used Hard Light for both the TARDIS and The Doctor. |
 |
| For this beauty I used blending again. I used the hard light for the TARDIS and Overlay for The Doctor |
 |
| So for this one I took a picture of a coffee cup and warped it :D |
Subscribe to:
Comments (Atom)